“Grape” expectations!

About 4 years ago, we bought a grapevine and planted it in a nice rustic half-barrel, surrounded by a variety of herbs.  It was a Thompson seedless — yum — and with “grape expectations”, we watched it grow… and grow… and grow!

The original arrangement — grape surrounded by mint, thyme, sage, rosemary, chives, I think there was some basil in there too — looked lovely at planting time. But as that grape vine grew, it lost its pretty, balanced shape and was no longer a fine anchor at the center of the arrangement.  I also found that it was not easy getting the half-barrel pot watered evenly and thoroughly.  Though care had been taken to ensure adequate drainage, that huge pot stayed pretty wet.  Not a great situation, and the bottom line was — no grapes.  I could deal with a big droopy vine, but grapelessness was unacceptable!  (It does take a few years for a new vine to reliably set fruit — but I wasn’t inclined to wait and see —  and had a new, better idea…)

So when winter came and the grapevine went dormant, we dug it out and replanted it at the base of a big new trellis archway.   The trellis came from Armstrong Gardens in Carlsbad — strong, but light, and scaled just right.  This created an archway entrance to our little garden.  That grape vine loved having its roots in terra firma, and over the next few years climbed up, around, above and beyond that trellis!  Each winter we’d snip off any vining branches that chose not to follow the trellis’ shape; the more we cut, the more robust the rest of the plant.  It wasn’t until this year, though, that we finally figured out how and when to prune to encourage maximum fruit.

Here’s how to prune a grapevine, for shape and for fruit:

Prune the vine back hard in the winter, when it’s dormant and leafless, leaving just a few long branches that go where you want them to go;

In the spring, let the new vines emerge and watch for them to bud.  Once buds appear, prune away any additional vine that grows above the fruit.

Budding Grapes, April 2015

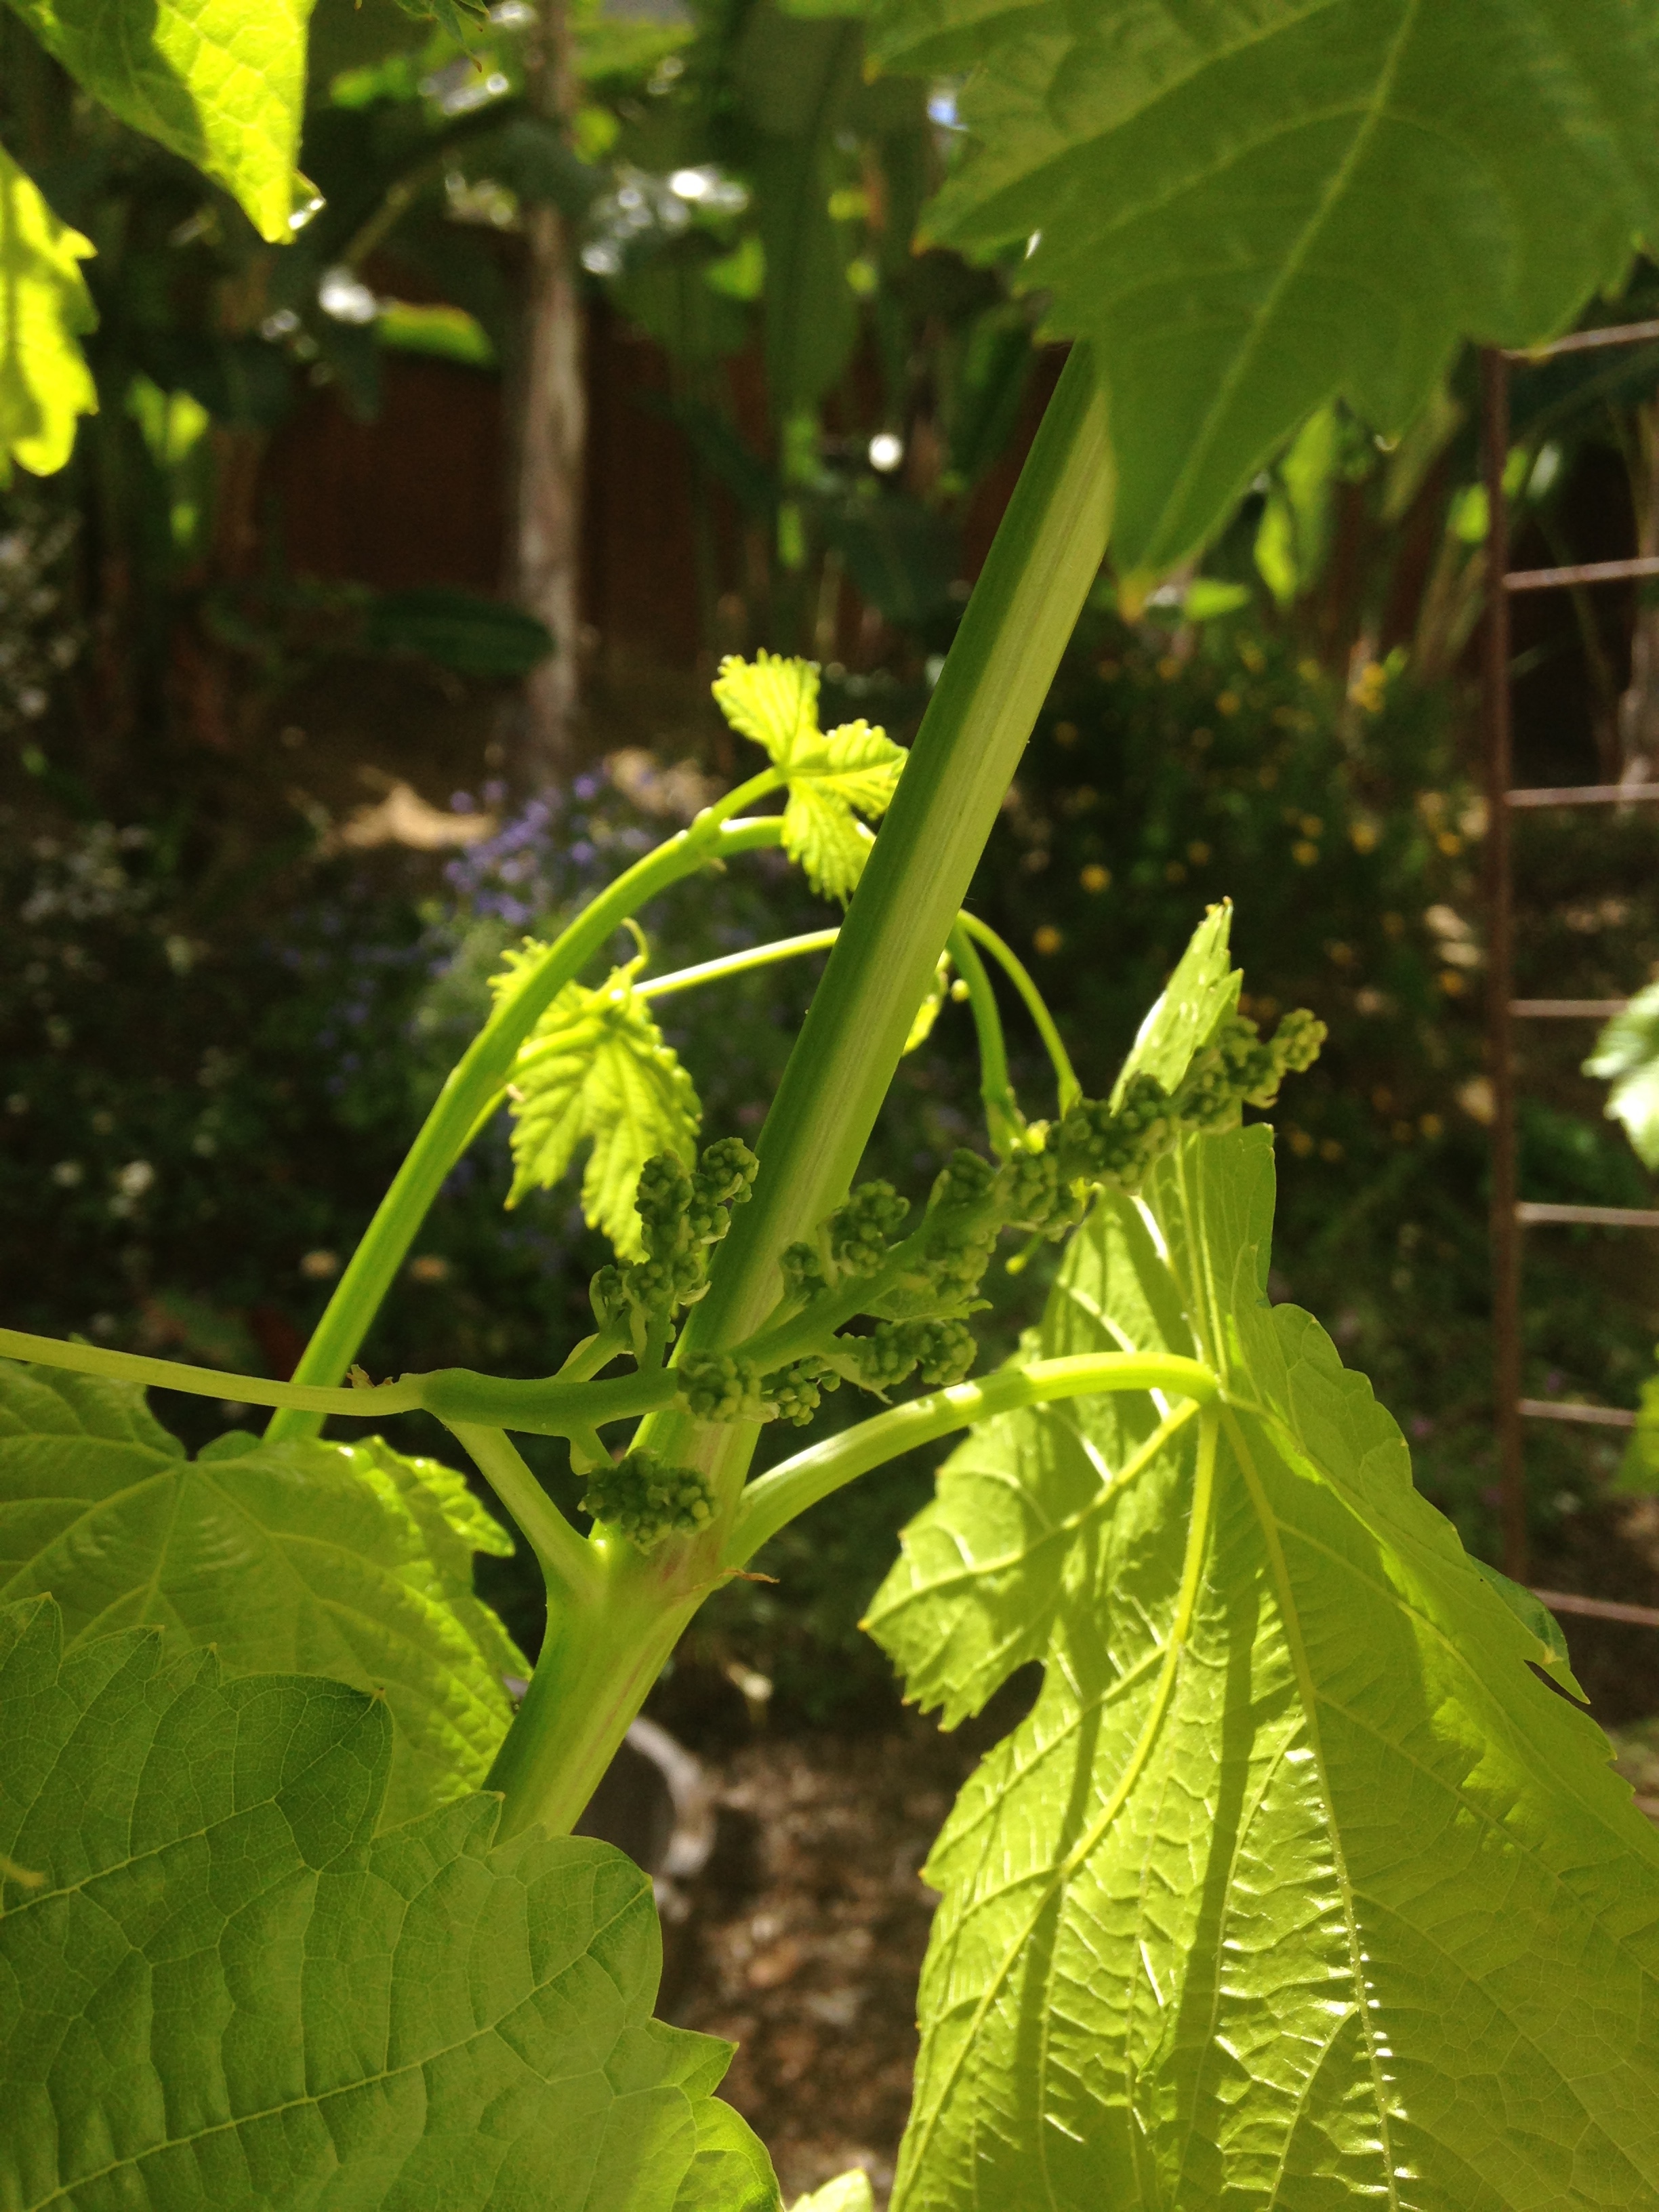
Then, start cutting off any vines that grow more than a few feet long without giving rise to buds.  Cut them off right at their bases.

As the spring / summer progress, the grape buds will flower, and grapes will begin to grow.  Once the grapes are set (by mid-May around here) remove all new vines and tendrils.  Remove any additional growth beyond the growing grapes.  This will channel as much of the plant’s energy into fruit growing as possible.

Watching the grapes grow! May 2015
Watching the grapes grow — May 2015

If you don’t prune at this point, the grapevine may continue budding. However, buds that appear too late won’t mature in time.  Grapevines have their own internal clock, they don’t produce year-round like many other perennials do here in San Diego.  At least, this has been our experience.

This is a very simple, but adequate-for-backyard-grower-purposes approach to pruning grapes — a pastime which has been refined to an absolute art by grape growers, over the millennia, around the world.

By the way, there’s a reason the Thompson seedless grape cultivar is the most widely grown grape in the world.  The grapes are delicious, thin skinned and of course, seedless; and now that we’ve got that plant planted in the ground (and our pruning system down), it is producing lots of grapes.  I’m pretty sure the kids have tasted some immature (very sour) grapes already; but the grown-ups are content to taste them with their eyes, until harvest time.

Buono appetito!

Jen.

Advertisement

carrots take the cake

Aliya lands a whopper!

One of my gardening rules is don’t bother planting things you can easily buy at the store that taste just as good. Unless, of course, when there’s a fun factor; an instant snacking gratification factor.  Carrots fit the bill!

Planting carrots from seed is fine family fun, especially when mom makes it go quick so it doesn’t get tedious. I use a chopstick to poke a row of holes, 2 inches apart. The girls then drop in the tiny seeds, smooth a little dirt over them to cover, and then take turns misting both seeds and themselves with water.  Two weeks later i invariably find a lovely row of carrot seedings, a few growing randomly among the potatoes and tomatoes, and sometimes even a funny little sprout heap six feet away. Thanks, girls, for bringing a little personality to the garden!

I do not recommend planting carrots from transplanted seedlings.  We’ve tried transplants unsuccessfully, and my research confirms that transplanting is not a reliable method of starting carrots.  Just because the garden store carries them, doesn’t mean they’re a great idea!

So, check out those seed packets.  Carrots come in tons of colors, shapes, and sizes — all interesting. They require very little to no effort to grow, just full sun and regular water.  They’re tasty, sweet, and crunchy.  You can make them into cake, for heaven’s sake!  But the best part about carrots is pulling them up.  Want to see a kid drop everything and come running into the garden?  Let her know there’s a carrot ready for the taking.  (A carrot’s ready when the above-ground foliage is thick and full — not wispy.  Also, you should be able to push away some of the dirt at the top of it, and get a sense for how developed the root underneath is; it should look/feel substantial.)

With the root vegetables, you never know quite what you’re going to get, especially when you buy a packet of carrot seeds promising a “Carnival Mix”.  Purple, white, red and orange. Par-tay!

ruby in the dirt: Swiss chard

Swiss chard is not a vegetable i ever ate, or even recognized, until we started growing it. now i realize why — the ordinary-looking stuff in the grocery store only vaguely resembles the luxuriant plants now growing themselves so effortlessly in our backyard.

today we have two varieties of Swiss chard going — the big and boisterous heirloom Ruby Red Rhubarb, and some sweet and petite Rainbow. Ruby Red (pictured below, along with a ruby-redheaded child) has been a real star — thriving in the fairly ideal environment of our raised beds, surviving in our hot, dry, much less inviting (for vegetables) xeriscaped borders. it’s grown through all 4 of our San Diego seasons, yielding enough tasty green leaves with crispy ruby stems for our family (4 solid food eaters) to eat 3 times a week. the plant pictured here is 2 years old.

Screenshot 2014-03-30 20.28.07

the child is 4.5 years old. she and the chard look like best of friends here, but she will NOT eat it in any recognizable form. more later on disguising vegetables for the purpose of feeding them to children.

our Rainbow chard has enjoyed a pampered existence in a portion of our raised beds that receives filtered, 3 season sunlight. 6 plants yield enough small-ish (<10 inch), smooth leaves for us all to eat our fill of them twice a week. these plants went in this fall, so they’re now about six months old. fingers crossed they perform as admirably as their scarlet-stemmed cousins.

Swiss chard passes (surpasses) each tenet of my “is it worth growing in the garden test“:

  • can I, organically and with relative ease, grow a better product than I can find in the grocery store?
  • if I grow it, will we eat it?
  • can I buy a perfectly acceptable substitute so easily and inexpensively that it’s just not worth it?

the chard we grow here is way prettier (and i’m guessing way tastier) than what i’ve seen at the store. it’s grown well with no special care and despite some real neglect. i can harvest a little or a lot at a time, so none ever goes to waste. cut, washed, and packed away a little wet, it stays fresh in the fridge for more than a week.

oh yeah and it tastes great! the green parts of the leaf are tender, with a flavor not unlike spinach, but lighter, more neutral. the stems stay crispy after steaming and are lightly sweet. i like to chop them up and they do fine things for a spaghetti Bolognese. finally, it’s more than paid for itself, still feeding us — daily — several years after I first tossed those seeds into the ground.

chard is the vegetable cornerstone of our vegetable garden. if you’re not growing it already, I invite you to try (and if you’re local, I have seeds for both the varieties discussed here, and will gladly share).

spring: a time for new beginnings!

IMG_7044

welcome to spears shoots & stalks, a blog about growing, cooking and eating vegetables.

are you excited to be here or what?!!

ok, ok, don’t worry if the prospect of raising your own chard doesn’t inspire you to jump the couch (yet).  that’s my job: to entice you with the prospect of planting, harvesting and preparing the freshest, yummiest, healthiest food you’ll ever eat!

this blog initially started as an exercise in gardening with children.  my three girls are what get me out bed in the morning; the garden is what gets me out of the house.  thank heaven for both!  but while you’ll notice lots of posts intertwining kids and garden, our garden is more than just another thing to do with kids.  it’s my thing; it’s a family thing; and it’s its own thing.  it’s always interesting, a constant source of change and surprise.  it can be soothing and therapeutic, gratifying and edifying; a source of revelations!  it can also be annoying and unpredictable and out of control. (oh yeah. sort of like kids.)

i don’t pretend to know a huge amount about growing vegetables (or children).  in the six years I’ve been gardening and parenting, i’ve had some conspicuous successes and some equally notable failures (the girls are unequivocal successes, despite certain of my failures).  But I am learning… and we’re all eating better… and the effect on the grown-ups’ health, in particular, has been awesome!  good clean fruit-and-vegetable input = optimal energy output!

I hope this blog will be of use to you!  Please do not hesitate to contact me with questions.  I’m just a regular chick who spears shoots & stalks.