Lemonade “With Benefits”: Mint, Kale and Spinach

We just got back from a HOT weekend in the desert — easily 110 degrees in the shade.  Such weather calls for lemonade, and lots of it!  I’m calling this twist on a hot-weather classic “Lemonade With Benefits” because it brings a healthy dose of garden-fresh greens to a classic summer treat.  No one has to know this lemonade is spiked with kale, spinach, etc. — they’ll see the bright and beautiful green color, but all they’ll taste is lemon, bright sugar, and a hint of mint!  Here’s how it’s (quickly and easily) done:

Lemonade “With Benefits”

Toss into high speed blender (i.e. Vitamix):

6 tbsp. lemon juice (approximately 1/3 cup)

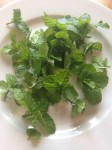
1/2 cup young, tender leaves of kale, spinach, or chard

1/2 cup sugar (or to taste)

Handful of mint leaves

Fill blender to 4 cups line with ice.  Add water until level reaches 5 cups.

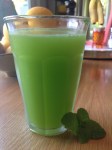
Blend on high speed until all ingredients are thoroughly blended, and enjoy.  Makes 5 cups of ice cold, sweet/tart, green lemonade!

A few notes.  The ice is crucial in this recipe.  It provides grit to help break down the greenery into drinkable, not-the-least-bit noticeable bits.  Also, a powerful blender (I use a Vitamix) is key.  It breaks the sugar down so thoroughly, there’s no need to make a simple syrup, as would be required in a standard lemonade recipe.  Finally, don’t skip the mint, unless you want to taste the vegetables in your lemonade.  Which would be pretty hard-core.

You can try other sweeteners in place of the sugar.  For me, the clean, bright, old-fashioned flavor of sugar is unbeatable.  Stevia would be an interesting substitute (homegrown stevia would be a dream!)  Also, feel free to reduce or increase the amount of sugar to suit your taste.

Lemonade with benefits!  Enjoy!  (Oh and enjoying watching even vegetable-averse kids drink up kale, spinach and chard with green-tinged smiles on their face — I know I do!)

— Jen.

Advertisement

{kid-friendliest} greenie

redhead rocks green juice!

so i’ve been blending up greenies for months now, and while Bob and I are sold — drinking our vegetables, and loving it! — the kids have not been having it.  but finally, today, i came up with a recipe that 2 out of 3 kids went crazy for (Aliya is my holdout.  weirdly, she is my only kid that will reliably eat vegetables in solid form.)  well 2 out of 3 kids going crazy for green juice is an excellent result ’round these parts — and here is the recipe:

kid-friendliest greenie (makes enough for 2 / 3)

2 to 3 cups of green leafy vegetables — kale, spinach, and/or chard — tough stems removed

1 orange or 2 to 3 tangerines —  peeled (seeds ok)

juice of 1/2 lemon — about 2 tbsp.

1/2 cup frozen cubed pineapple — pineapple is pivotal here, it’s what sets this greenie apart

1 banana — adds body to the brew

1/2 cup coconut water

1/2 cup ice — or more for a frostier greenie

2 tbsp. chia seeds

blend in a Vitamix or similar high-powered blender until creamy and smooth.

you’ll find that the lemon, orange and pineapple completely hide the flavor of the greens — they are seen, but not tasted!  the lemon also keeps the banana in this blend from oxidizing, so it retains its bright green color.  not only that, the vitamin C in all that citrus helps your body absorb the vitamins in the greens.  you should feel amazing after drinking this greenie; don’t be amazed if even your pickiest, vegetable-avoiding kid, insists on draining your glass!

{crave-able} kale chips

The kale I started from seed in January has grown up; and kale chips are the perfect thing to do with it!  Do your body a favor and indulge in some crispy, crave-able kale chips, ASAP!  Here’s how i make them:

ingredients:

kale leaves (about 12 good sized leaves’  worth per baking sheet)

1 tbsp. olive oil

kosher salt to taste

fresh ground black pepper to taste

optional add-ons: paprika, parmesan cheese, red pepper flakes, dried garlic

instructions:

heat oven to 275 degrees

remove ribs from kale leaves.  wash and dry leaves in a salad spinner.  pour olive oil into your nice clean hands, then use hands to completely coat kale in a very thin layer of olive oil.  spread kale out on baking sheet(s) and sprinkle with salt (i love kosher salt’s flaky texture and light taste) and a little pepper.  bake for about 15 mins., then use tongs to stir, keeping the kale evenly spread out.  check for doneness every few minutes after that — the finished product will be very crispy, feather light, and much reduced in size.  remove from baking sheet and enjoy right away.

we’ve tried a couple of different flavors too; i don’t think you can go wrong.  our favorite variation: after spreading kale on baking sheet, sprinkle with salt, paprika, parmesan and red pepper flakes.  no idea on the quantities, but i use a light hand.

FYI, kale chips do not improve with age!  Serve them straight from the oven.  Also, the fresher the kale is, the better your kale chips will taste.  For best results, go with homegrown or farmer’s market kale — you will absolutely taste the difference!