According to a Jan. 17 article published by The Xerces Society, monarch butterfly populations plummeted precipitously in 2018. The numbers counted were scary-low, the estimated declines, scary-high: possibly more than 90%.
Planting milkweed to restore lost habitat is one important way that concerned citizens can go out and make a difference ASAP. However, gardeners wishing to help butterflies may actually be compounding the problem by unwittingly planting non-natives. Non-native milkweeds, such as the popular Tropical milkweed (Asclepias curassavica), and others which are native somewhere within the U.S. but not in one’s particular climate / region, may actually be interfering in the butterflies’ natural migration patterns.
The following photos are taken from the Xerces Society website. Can you spot the U.S. native?
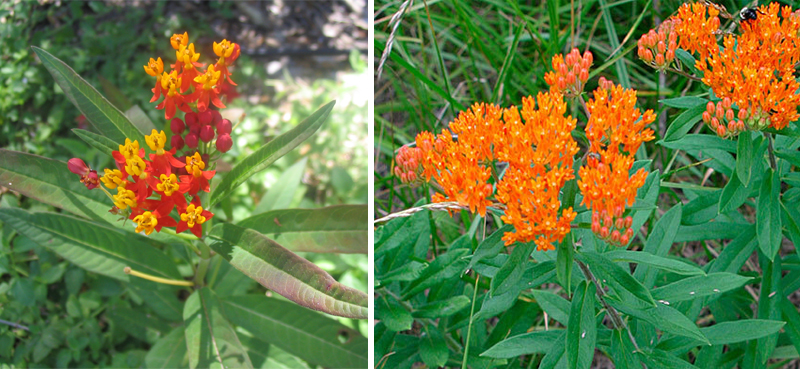
On the left you see Tropical milkweed, A. curassavica. It is NOT native and as such can harbor overwintering parasites and disrupt monarch migration patterns. On the right, Butterfly Weed, A. tuberosa, is native to most of the U.S. (but not to the Pacific Northwest). The milkweeds look quite alike; they both attract monarchs; but they are not to be planted interchangeably.
If you have Tropical milkweed in your backyard , then you know monarchs love it. A monarch loves this plant so much it’ll migrate all the way down from Portland or Toronto to Mexico to get its little proboscis on it! But despite its seeming success in your butterfly garden; despite what the “Gardening Expert” at your local garden center says, or what the bold print on the seed packet might claim, A. curassavica is not native to the United States. It simply doesn’t belong here.
I’m not going to go down the path of telling you you’re only supposed to plant California natives in your California garden. The garden, and I think the planet, welcomes a little multiculturalism; Japanese maples in Seattle, Dutch tulips in Central Park, and the like! But, for the sake of our international guests the monarch butterflies, it may be true that only one kind of gardening will do — and that’s to preserve and plant native milkweeds for their benefit.
I believe I’ve witnessed some of the negative aspects of butterfly gardening with non-native milkweed firsthand. When I first purchased and planted Tropical milkweed five-or-so years ago, respectable manager-types at two local garden stores (plus a cursory dip into the Internet) reassured me that it was either “native” or “just fine”. We had nothing but success with these plants, and the butterflies they hosted, for the first few years. Strong, beautiful butterflies; fantastic photos; cherished memories.


Maya and Aliya holding a newly hatched Monarch, and a nice plump caterpillar


But as time has passed, even as the plant has spread throughout our backyard, we began to experience diminishing returns, with far fewer monarchs making it past the chrysalis stage. I suspected a parasite or fungus at work, a hunch which sent me deep into the Internet in search of research, and finally landed on this piece by the Xerces Society. If you have Tropical milkweed growing in your garden, please take a moment to read the most cogent, comprehensive, compelling words I’ve seen on the topic:
By the time I got to the last paragraph, having recognized the OE parasite condition pictured and described, I’d taken the decision to pull out all our Tropical milkweed and to start again, after last chance of frost, using native plants specifically suited to our Southern California Coastal Climate.
A search for milkweed seeds vis-a-vis the Xerces Society led me to the Theodore Payne Foundation, a not-for-profit dedicated to educating “Southern Californians about the beauty and ecological benefits of California native plant landscapes”. Thanks to the guidance of Genny, who graciously took the time to continue to educate me — navigating the native milkweed universe is trickier than one might expect! — I’ve ordered two truly native So Cal milkweeds: Narrow-leaved milkweed, (A. fascicularis) and Kotolo (aka Woolly or Woolly-pod milkweed (A. eriocarpa).

A. eriocarus, aka Kotolo, woolly, or woolly-pod milkweed

A. fascicularis, Narrow-leaf milkweed
These seeds required a little more effort to track down, and they’re not free (as opposed to the A. curassavica which would be more than happy to continue self-sowing in my backyard), but they’re the real deal. I’m happy to share them, too, so message me if you’d like seeds.
More on the monarch situation, and more steps we, the people, can take to support them. But first: let’s do no harm. I’ll be taking this mid-winter opportunity, while my Tropical milkweed plants leafless and monarch-free, to pull ’em.