watch a monarch caterpillar (fresh from our butterfly garden) wriggle free of its old skin and dramatically, energetically, transform into a chrysalis! this four minute, real-time video might not be the prettiest or most professional “chrysalis reveal” on youtube, but it does feature some delightfully unscripted four- and six- year-old commentary!
{my personal, metaphysical uptake, after witnessing this amazing metamorphosis: that caterpillar doesn’t just hang there, waiting to be transformed. it is active, an active participant; it WORKS for that miracle!}
Making cashew milk couldn’t be easier, and it’s the tastiest (non-)milk ever! Cashew milk is simply wonderful in coffee; cereal or granola; adds healthy fats to a vegan smoothie; and has a creamy, smooth texture without having to be strained. Here’s all you need to know to make this nutritious, non-dairy beverage at home: preservative-, additive- and of course dairy-free.
Ingredients:
1 cup raw cashews
3 cups filtered water
Optional but yummy: 3 dates, or agave syrup to taste
Optional but divine: 1/2 tsp. vanilla extract (and/or 1 inch piece of vanilla bean)
Instructions:
Before making: soak cashews at least 4 hours (up to overnight) in the refrigerator, in enough water to cover them well. Drain and thoroughly rinse cashews with fresh water before placing them in blender. Add three cups of filtered water. Add extras like dates and/or vanilla, if using, and blend until smooth, smooth, smooth (I use the preprogrammed “smoothie” setting on my Vitamix). Pour into serving cup(s) and enjoy!
Now, read on if you’re thirsty for the “fine print”, including “why’s” and “how-to’s”:
Soaking cashews at least 4 hours or overnight (but not longer than overnight, they could get slimy) — then rinsing them well — removes phytic acid, improving the cashews’ digestibility and making their nutrients easier to absorb. It also makes them easier to blend, and removes “off” flavors — the more you rinse them, the cleaner the flavor in the end. That said, I’ve made cashew milk without the soaking step, and it (I) was just fine — but others have reported tummy trouble.
Cashew milk keeps in fridge for at least three or four days, probably longer… I haven’t had a batch go bad in the fridge yet. Cashew milk will begin to separate after a few hours; a quick shake will restore it to smoothness.
I soak my cashews in a glass container, and I store the cashew milk in glass containers, too. A big stash of repurposed Bonne Maman jam jars contains my milk (and soups, and pesto, and leftovers of every sort) nicely. You can drink out of them, too — and then, screw the lid on — you’ve got a plastic-free to-go cup for your coffee (or cashew-milk enriched smoothie!). I don’t like to use plastic to contain our potables or our edibles. Even “BPA-free” plastic containers are suspect, in my book; have you ever tasted water that’s spent a couple of hours in a kid’s “BPA-free” sippy cup? It tastes like plastic. That can’t be good. At the very least, it doesn’t taste good.}
To make cashew cream, simply reduce the water in the recipe to 3/4 cup, then blend, adding more by the tablespoon until the desired consistency is achieved.
There you have it — Captivating Cashew Milk! let me know what you think of this simple recipe — and what terrific uses you put it to!
One of my gardening rules is don’t bother planting things you can easily buy at the store that taste just as good. Unless, of course, when there’s a fun factor; an instant snacking gratification factor. Carrots fit the bill!
Planting carrots from seed is fine family fun, especially when mom makes it go quick so it doesn’t get tedious. I use a chopstick to poke a row of holes, 2 inches apart. The girls then drop in the tiny seeds, smooth a little dirt over them to cover, and then take turns misting both seeds and themselves with water. Two weeks later i invariably find a lovely row of carrot seedings, a few growing randomly among the potatoes and tomatoes, and sometimes even a funny little sprout heap six feet away. Thanks, girls, for bringing a little personality to the garden!
I do not recommend planting carrots from transplanted seedlings. We’ve tried transplants unsuccessfully, and my research confirms that transplanting is not a reliable method of starting carrots. Just because the garden store carries them, doesn’t mean they’re a great idea!
So, check out those seed packets. Carrots come in tons of colors, shapes, and sizes — all interesting. They require very little to no effort to grow, just full sun and regular water. They’re tasty, sweet, and crunchy. You can make them into cake, for heaven’s sake! But the best part about carrots is pulling them up. Want to see a kid drop everything and come running into the garden? Let her know there’s a carrot ready for the taking. (A carrot’s ready when the above-ground foliage is thick and full — not wispy. Also, you should be able to push away some of the dirt at the top of it, and get a sense for how developed the root underneath is; it should look/feel substantial.)
With the root vegetables, you never know quite what you’re going to get, especially when you buy a packet of carrot seeds promising a “Carnival Mix”. Purple, white, red and orange. Par-tay!
The kale I started from seed in January has grown up; and kale chips are the perfect thing to do with it! Do your body a favor and indulge in some crispy, crave-able kale chips, ASAP! Here’s how i make them:
ingredients:
kale leaves (about 12 good sized leaves’ worth per baking sheet)
1 tbsp. olive oil
kosher salt to taste
fresh ground black pepper to taste
optional add-ons: paprika, parmesan cheese, red pepper flakes, dried garlic
instructions:
heat oven to 275 degrees
remove ribs from kale leaves. wash and dry leaves in a salad spinner. pour olive oil into your nice clean hands, then use hands to completely coat kale in a very thin layer of olive oil. spread kale out on baking sheet(s) and sprinkle with salt (i love kosher salt’s flaky texture and light taste) and a little pepper. bake for about 15 mins., then use tongs to stir, keeping the kale evenly spread out. check for doneness every few minutes after that — the finished product will be very crispy, feather light, and much reduced in size. remove from baking sheet and enjoy right away.
we’ve tried a couple of different flavors too; i don’t think you can go wrong. our favorite variation: after spreading kale on baking sheet, sprinkle with salt, paprika, parmesan and red pepper flakes. no idea on the quantities, but i use a light hand.
FYI, kale chips do not improve with age! Serve them straight from the oven. Also, the fresher the kale is, the better your kale chips will taste. For best results, go with homegrown or farmer’s market kale — you will absolutely taste the difference!
Swiss chard is not a vegetable i ever ate, or even recognized, until we started growing it. now i realize why — the ordinary-looking stuff in the grocery store only vaguely resembles the luxuriant plants now growing themselves so effortlessly in our backyard.
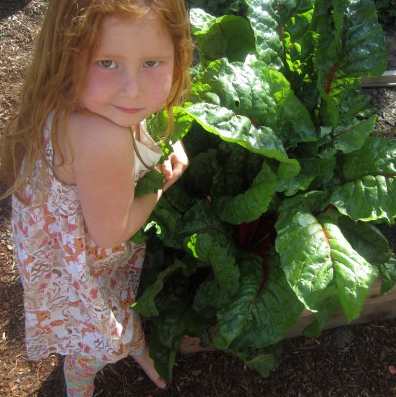
today we have two varieties of Swiss chard going — the big and boisterous heirloom Ruby Red Rhubarb, and some sweet and petite Rainbow. Ruby Red (pictured below, along with a ruby-redheaded child) has been a real star — thriving in the fairly ideal environment of our raised beds, surviving in our hot, dry, much less inviting (for vegetables) xeriscaped borders. it’s grown through all 4 of our San Diego seasons, yielding enough tasty green leaves with crispy ruby stems for our family (4 solid food eaters) to eat 3 times a week. the plant pictured here is 2 years old.
the child is 4.5 years old. she and the chard look like best of friends here, but she will NOT eat it in any recognizable form. more later on disguising vegetables for the purpose of feeding them to children.
our Rainbow chard has enjoyed a pampered existence in a portion of our raised beds that receives filtered, 3 season sunlight. 6 plants yield enough small-ish (<10 inch), smooth leaves for us all to eat our fill of them twice a week. these plants went in this fall, so they’re now about six months old. fingers crossed they perform as admirably as their scarlet-stemmed cousins.
Swiss chard passes (surpasses) each tenet of my “is it worth growing in the garden test“:
can I, organically and with relative ease, grow a better product than I can find in the grocery store?
if I grow it, will we eat it?
can I buy a perfectly acceptable substitute so easily and inexpensively that it’s just not worth it?
the chard we grow here is way prettier (and i’m guessing way tastier) than what i’ve seen at the store. it’s grown well with no special care and despite some real neglect. i can harvest a little or a lot at a time, so none ever goes to waste. cut, washed, and packed away a little wet, it stays fresh in the fridge for more than a week.
oh yeah and it tastes great! the green parts of the leaf are tender, with a flavor not unlike spinach, but lighter, more neutral. the stems stay crispy after steaming and are lightly sweet. i like to chop them up and they do fine things for a spaghetti Bolognese. finally, it’s more than paid for itself, still feeding us — daily — several years after I first tossed those seeds into the ground.
chard is the vegetable cornerstone of our vegetable garden. if you’re not growing it already, I invite you to try (and if you’re local, I have seeds for both the varieties discussed here, and will gladly share).
welcome to spears shoots & stalks, a blog about growing, cooking and eating vegetables.
are you excited to be here or what?!!
ok, ok, don’t worry if the prospect of raising your own chard doesn’t inspire you to jump the couch (yet). that’s my job: to entice you with the prospect of planting, harvesting and preparing the freshest, yummiest, healthiest food you’ll ever eat!
this blog initially started as an exercise in gardening with children. my three girls are what get me out bed in the morning; the garden is what gets me out of the house. thank heaven for both! but while you’ll notice lots of posts intertwining kids and garden, our garden is more than just another thing to do with kids. it’s my thing; it’s a family thing; and it’s its own thing. it’s always interesting, a constant source of change and surprise. it can be soothing and therapeutic, gratifying and edifying; a source of revelations! it can also be annoying and unpredictable and out of control. (oh yeah. sort of like kids.)
i don’t pretend to know a huge amount about growing vegetables (or children). in the six years I’ve been gardening and parenting, i’ve had some conspicuous successes and some equally notable failures (the girls are unequivocal successes, despite certain of my failures). But I am learning… and we’re all eating better… and the effect on the grown-ups’ health, in particular, has been awesome! good clean fruit-and-vegetable input = optimal energy output!
I hope this blog will be of use to you! Please do not hesitate to contact me with questions. I’m just a regular chick who spears shoots & stalks.